home / patterns / pumpkin coaster
Pumpkin Coaster
Free pattern · flat circle + stem + leaf · US terms
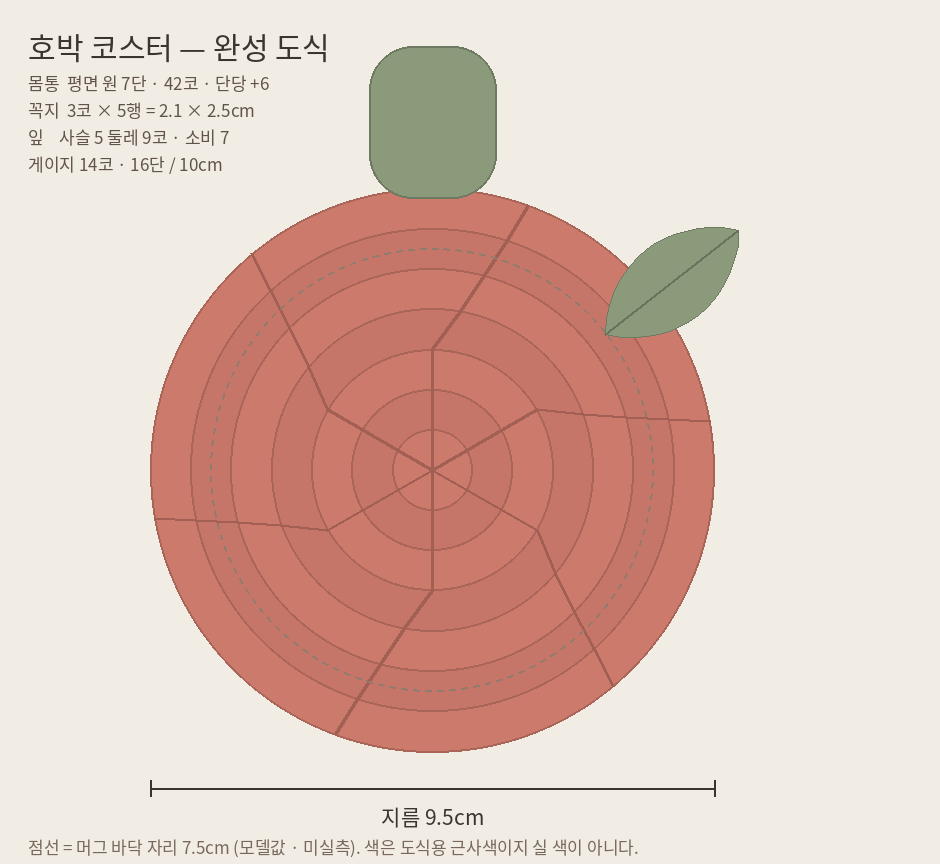
A coaster that reads as a pumpkin: a flat circle body, a little rectangular stem, and one leaf worked around both sides of a chain. Three small pieces, one evening. Every round below carries its stitch count — that's the house style, because the counts are what the pattern was checked against.
Materials
- Pumpkin colour — worsted / CYC #4 acrylic, about 8.3 g per coaster (33 g for a set of four — 0.66 of a 50 g ball). Dusty rose, terracotta, or cream all read as "pumpkin".
- Sage green — same weight, about 1.2 g per coaster (stem and leaf).
- 4.0 mm hook, tapestry needle, scissors, stitch marker.
Substituting yarn? Match the gauge below rather than the label — any smooth #4 acrylic or cotton at 14 sts / 10 cm will land on the same size.
Gauge
14 sts · 16 rows = 10 cm in single crochet with a 4.0 mm hook. Gauge decides the finished diameter here — at a different gauge the coaster still works, it just lands on a different size.
Pattern — body
Worked in a continuous spiral from a magic ring — mark the first stitch of each round.
- R16 sc into a magic ring6
- R2[inc] ×612
- R3[inc, sc] ×618
- R4[sc, inc, sc] ×624
- R5[sc 2, inc, sc] ×630
- R6[sc 3, inc, sc] ×636
- R7[sc 4, inc, sc] ×642
Notice the increases drift one stitch later each round. That's deliberate: stack the increases in the same spot every round and the counts stay identical — but you crochet a hexagon, not a circle. The count can't see the difference; the placement is the circle.
Pattern — stem
Worked flat in rows. Chain 4 to start; ch 1 and turn at the end of each row.
- Row 1sc 3 across the chain3
- Rows 2–5ch 1, turn, sc 33
Pattern — leaf
One round, worked along both sides of a chain-5.
- R1 slst, hdc, sc, 3 sc in the end chain, sc, hdc, slst — then join with a slst 9
Round-by-round numbers
Body rounds. The +6 per round isn't taste — it's 2π × stitch height. More and it ruffles; less and it cups.
| Round | Stitches | Increase | Increase offset | Diameter |
|---|---|---|---|---|
| 1 | 6 | — | — | 1.4 cm |
| 2 | 12 | +6 | at repeat start | 2.7 cm |
| 3 | 18 | +6 | at repeat start | 4.1 cm |
| 4 | 24 | +6 | 1 st later | 5.5 cm |
| 5 | 30 | +6 | 2 sts later | 6.8 cm |
| 6 | 36 | +6 | 3 sts later | 8.2 cm |
| 7 | 42 | +6 | 4 sts later | 9.5 cm |
Finishing
- Weave in the body's ends. On the stem and leaf, fasten off leaving a long tail for sewing.
- Whip-stitch the stem upright to the centre-top of the body's last round — its 3 base stitches onto 3 body stitches.
- Whip-stitch the leaf beside the stem at roughly 45° — anchor only its base, leave the tip free.
- Bring all remaining ends to the back of the body. Ends on the front sit under the cup.
- Block flat under a damp towel. Flatness is the function — skip this and the mug wobbles.
This pattern passed kobyko's arithmetic check: 0 errors, 0 warnings across stitch consumption/production, round totals, flat-circle increase rate, and gauge-to-size — 11 self-check items on the generated chart, registered as engine test case 25. The counts printed above are the checked values, not a transcription.
Take it offline
The ad-free PDF has the same checked numbers, a printable chart, and the colour diagram.